Push2Run Setup for Dropbox
Of note, Push2Run is not released nor supported by Dropbox.
This page explains how to setup Push2Run and control your Windows computer using a Google Assistant (Google Home, Google Mini, Google Max, or smart phone running Google Assistant), IFTTT, Dropbox and Push2Run.
The example below shows you how to open the Windows calculator on your PC or laptop (however, you can click here to find out how to run any program, batch or script file, open a file or website, restart or shutdown your computer, etc.):
What you will need, a:
|
1. Google Home, Google Mini, Google Max, or smart phone running Google Assistant 2. Windows computer 3. (free or paid) account with Dropbox 4. (free) copy of Push2Run 5. (free) account with IFTTT |
What to do:
Now comes the part that's kind of like Mousetrap, here is how it all fits together ...
| 1. |
Signup for a Dropbox account at the Dropbox website and then download and install the Dropbox software on your computer |
| 2. | Install and run Push2Run on your PC or Laptop When Push2Run is first run you should be prompted to setup up Dropbox, Pushbullet, Pushover, or MQTT; these instructions explain how to setup Dropbox. |
| 3. | On the Push2Run - Options window, in the Dropbox settings: - check 'Enable Dropbox' - enter a Dropbox folder path specific to use with Push2Run. The folder name can be anything you want on your local Dropbox drive, and be more than one layer down (as in the example below - where it is folder called Push2Run inside another folder called Apps). The Dropbox folder path entered here should end in a "\" (without the quotes. Please enter the Dropbox folder path including the drive letter (as seen below). You need to remember what you set up here for step 14 below. - enter a file name specific for use with Pushover. The default is Command.txt but it can be anything you want. You need to remember what you set up here for step 14 below. - leave the Device name set to its default value (although you can change it if you like) - this too is also used in step 14 below. |
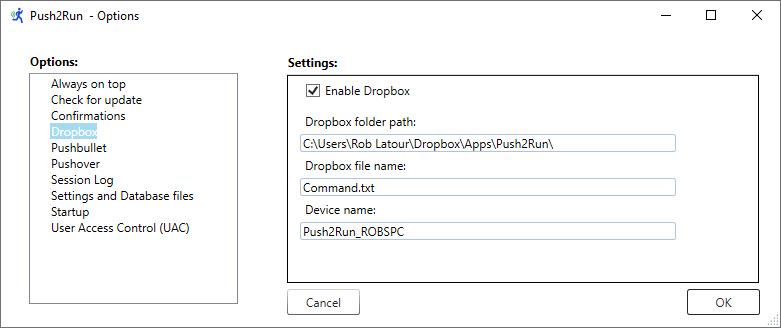 |
- click OK to close the Options window
| 4. |
Sign onto IFTTT Notes: a) if you don't already have an IFTTT account, you will need to click on 'Sign up' to create one; its easiest if you sign on using your gmail account via the 'Continue with Google' option b) if you haven't already linked your gmail account, click on the icon of a person's head (top right), click on 'Account' - from this window link your Google account to IFTTT; you should use the same Google account you have linked to your Google Home/Mini/Max/device). You should also link your Dropbox account; you will be prompted to do this in step 14. |
| 5. | In IFTTT click on the icon of a person's head (top right), click on 'Create', |
| 6. | On the IFTTT "Create your own" window, click on the "+ this" in the "if + this then that", |
| 7. | In the search for services, search for "Google Assistant" and select it, |
| 8. | Select "Say a phrase with a text ingredient",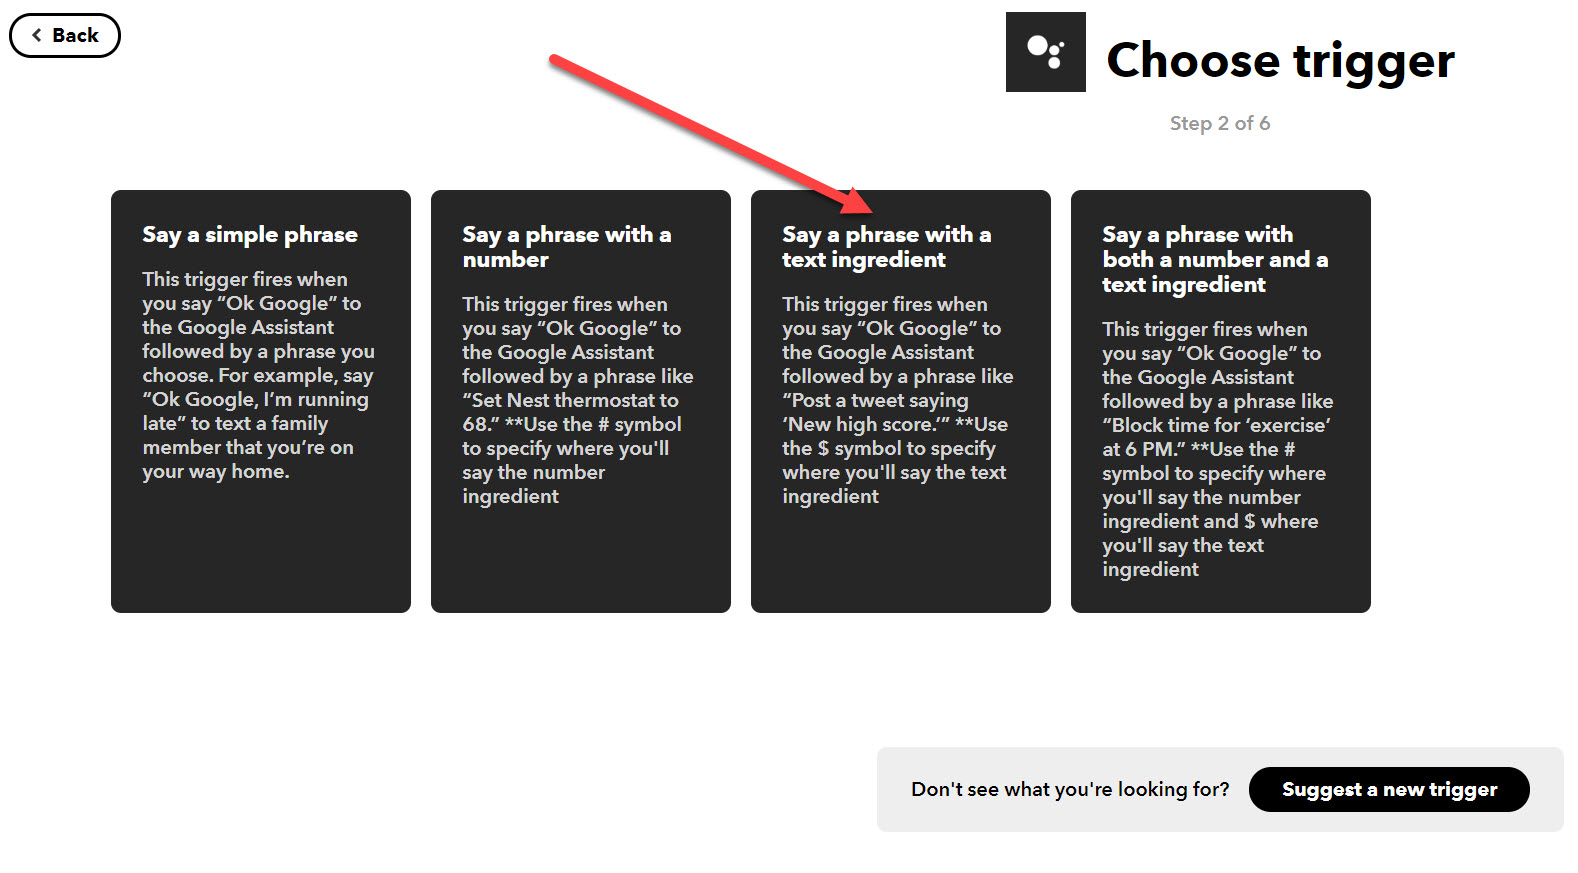 |
| 9. | Complete the form as follows: |
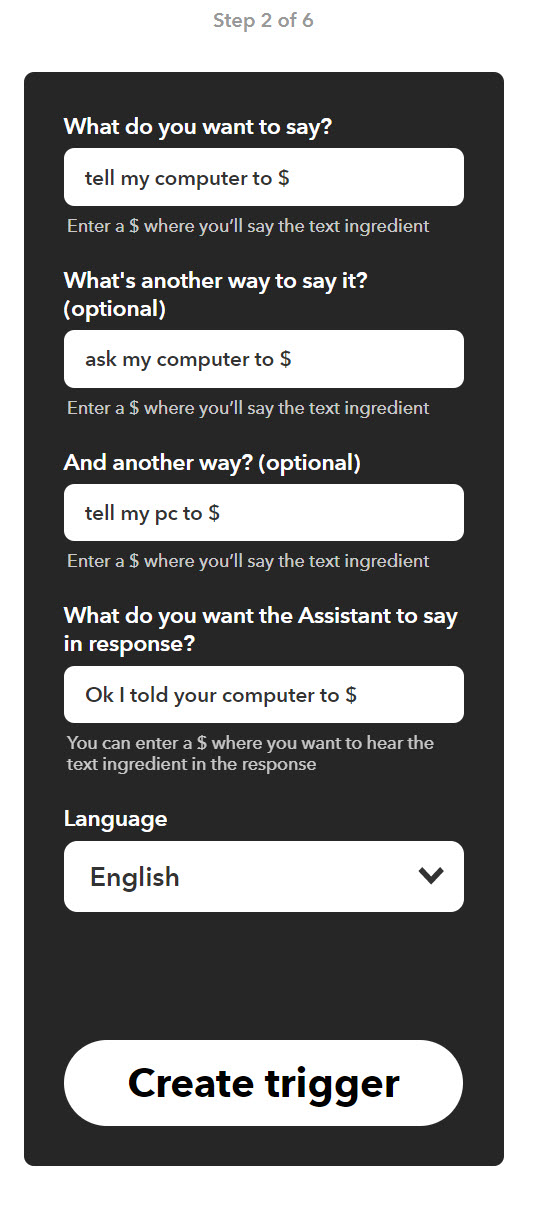 |
Note: do not use "Open $" as a phrase that you want to use, Google has this somehow reserved and it doesn't work with IFTTT.
| 10 | Click on "Create trigger", |
| 11. | Click on "then that" in the "if + this then that", |
| 12. | Click on Dropbox, |
| 13. | Click on 'Create a text file', |
| 14. |
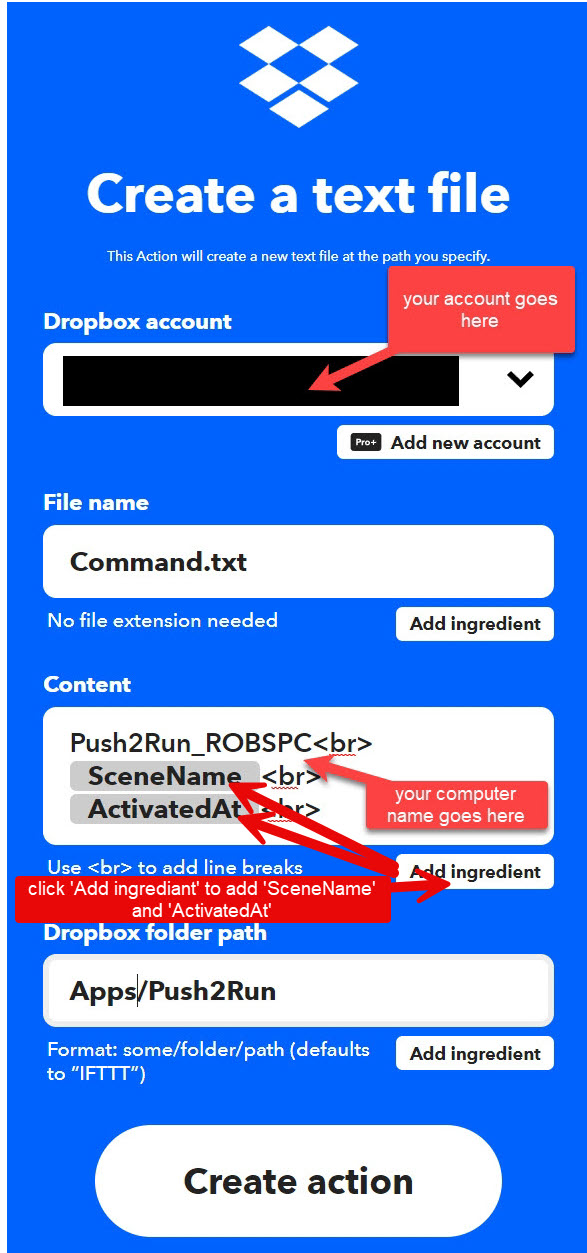
Complete the IFTTT-Pushover 'Complete action fields' window as below Notes: Linking you Dropbox account: If you have not linked your Dropbox account to IFTTT before, you will be prompted to do so in this step. the File name field: should have the same value as was used in step 3 above. The default is: Command.txt the Content field: should contain: the Device name you used in step 3 above. It should be followed by "<br>" without the quotes as shown below, followed by the IFTTT ingredient {{TextField}} and by "<br>" without the quotes as shown below, followed by the IFTTT ingredient {{CreatedAt}} and by "<br>" without the quotes as shown below. the Dropbox folder path: should contain the part of the folder path used in step 3 above which follows ....\Dropbox\ the Dropbox folder path used here should not end in a slash. Please see the screenshot below for greater clarity. *** Important *** If you include a slash in the Dropbox folder path as in the screen shot below, please make sure it is a forward slash ("/") not a backslash ("\"). If you use a forward slash your IFTTT applet will work, if you use a backslash it will not work and you will get an error message in your IFTTT activity history that says the Applet failed and there was a problem with the Dropbox service (but no other clue as to what the problem may be). |
 |
| 15. | Click on "Create action", |
| 16. | Click "Finish", |
| 17. | Give it a try by saying to your Google Assistant "OK Google tell my computer to open the calculator". |
Note: depending on the virus software you are running, when Push2Run first attempts to access your Dropbox folder you may be prompted to give it permission to do so. When working with Dropbox Push2Run only works with the Dropbox folder path and filename you specify (in step 3 above).
For additional help
Please see the Push2Run Help webpage.
A Ruler for Windows A Form Filler CallClerk Concentration FixMyLocation
MyArp Reporting for Rackspace S-Controller SetVol UDPRun